User Management
Description
In this module you’ll learn how to add, edit, and remove users within your WordPress website. This module will introduce the user roles that exist within WordPress, but will focus on the how-to of user management, and not the organizational philosophy behind deciding which users are assigned various roles and permissions.
Objectives
After completing this lesson, students will be able to …
- Update their own profile
- Customize the visible columns in the Users table
- Create a new user account
- Enable/Disable the ability for users to register their own account
- Use the search, filter, and batch modification tools within the users table to find and/or modify existing users
- Add and remove permissions (via Roles and Capabilities) for individual users
- Reset a user’s password
- Disable a user without deleting them
- Delete a user
- Reassign a deleted user’s content to another user
Prerequisite Skills
- Basic familiarity with the WordPress Administrative Dashboard
Assets
- A user account with the “Administrator” Role
Screening Questions
- Are you familiar with the WordPress administrative Dashboard?
- Do you understand the need for user accounts and security with shared technology?
- Are you familiar with the roles of subscribers, authors, and editors in a publishing process?
Teacher Notes
- Performing a live demo while teaching the steps to manage users is crucial to having the material “click” for students.
- While a sandboxed site is not necessary for this lesson, it is recommended. Ideally, students would not be modifying permissions or adding and removing real users from an actively used website.
- This lesson is best suited for a WordPress site that doesn’t have plugins for advanced user management installed—for example, any plugins for adding custom roles and capabilities.
- This lesson does not cover the “Super Admin” role used in the Network Admin Screen.
Hands-on Walkthrough
Introduction: What is User Management
Welcome to User Management! Today you are going to learn how to add, remove, and update user accounts within your WordPress website, including a couple advanced topics like changing a user’s username. User management is important and useful for a few reasons:
- You may want to add another user to your website without allowing public registration for new accounts.
- You may want to promote an existing user to a role where they can create content for your site, demote an existing user, or remove their account entirely.
- Perhaps you created your website with the default administrator username “admin” and later learned that’s not the best security practice and would like to change your own username.
- As your website grows, it’s best security practice to disable or remove old and unused accounts.
Roles and Capabilities
As you dig into User Management, you’ll see several user Roles appear. This module doesn’t dive deeply into what each of these roles are capable of, or why you should give a specific user a specific user role, but you will want to be familiar with them. The WordPress Codex describes each role briefly as:
Administrator – somebody who has access to all the administration features within a single site.
Editor – somebody who can publish and manage posts including the posts of other users.
Author – somebody who can publish and manage their own posts.
Contributor – somebody who can write and manage their own posts but cannot publish them.
Subscriber – somebody who can only manage their profile.
For this lesson, the user account you access your WordPress site with should be of the “Administrator” role. For more information about the capabilities of each role type, review the complete Roles and Capabilities article in the WordPress Codex.
Users Menu
To manage users you’ll use tools within the Users menu on the Dashboard, along with General Settings.
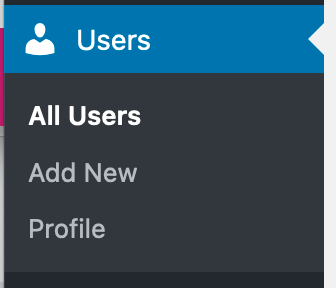
Users > All Users: The All Users table is a complete listing of all users within your WordPress site, including your own user account. From the table listing, you have access to bulk actions, where you can modify multiple users at the same time.
Users > Add New: Add New allows you to manually add a new user. This is important if users are unable to register their own accounts and all new accounts are created by you or another administrator.
Users > Your Profile: Your Profile is where you can update information within your own profile. If you’re instructing another logged in user to update their own profile, the same URL applies. (e.g., yourwebsite.tld/wp-admin/profile.php)
Settings > General: Within the Settings menu, General includes an option for allowing users to register their own new account. By default this option is disabled in a new WordPress installation, but if your website has many users, you may elect to enable this and only use your administrator account to promote specific users into roles with more capabilities.
In the following lessons, we’ll dig into each of these screens and the important tasks you can perform within them.
yourwebsite.tld/wp-admin/
Update Your Own Profile
- On the WordPress Toolbar hover over your username in the upper-right corner of the screen and select Edit My Profile, or on the User menu in the Dashboard select Your Profile.
- Scroll down to the Name section, where you can fill in your name, nickname, contact information, biography, and profile picture.
Your Display Name
Your display name is the name shown when browsing content on the website. It typically appears as an author attribution on posts, as well as comments on posts or pages. You may choose to display your WordPress username, any combination of your first and last name, or your specified nickname. Also note:
- If you’ve not filled in your full name in the First Name or Last Name fields, these options will not appear in the display name dropdown. Likewise, if your nickname is the same as your username, only one of the two will appear.
- Some themes may hide authors from posts or pages.
Your Profile Picture
By default, changing your profile picture is tied to your Gravatar account. To learn more about using Gravatar visit: https://en.gravatar.com/
Your Email Address
Your email address is required by WordPress, to support system notifications and to be used if password recovery is ever necessary to regain access to your account. Also note:
- If you change a user’s email address, including your own, WordPress will automatically email the previous email address with a “Notice of Email Change” message. This is a security feature, to allow a user to report any malicious or suspicious activity.
- If a user’s email address is changed, by default the Gravatar will update to reflect a photo associated with the new email address. If the old and new email addresses both use the same photo within Gravatar, you may not notice this change.
Add a New User
- On the User menu in the Dashboard select Add New.
- On the Add New User page, create a new user by assigning them a username (the name they will use to log into WordPress), a valid email address, and any other optional details.
- Choose an appropriate role for this new user. Learn more about roles below.
- When you’ve filled in any details, click the Add New User button at the bottom of the page to save the new user.
Password Creation
By default, the new user’s password will be automatically generated and hidden from you. If you need to know the user’s password, or intend to create a custom password, use the Show Password button. This is an optional step and is not typically necessary in the user creation process. Also note:
- A new user will automatically be sent a welcome email by WordPress with their new login information, including the generated password. The user will be prompted to log in and to change their password to one of their liking. If you have assigned them a custom password, they will still have the ability to and will be encouraged to update their password.
- If you’d like to suppress the welcoming email, you may uncheck the “Send the new user an email about their account” option below. This step is not typically recommended, but may be useful if you’re adding many users in preparation for a website that is not ready to be revealed to its users. Be aware, if a user has not been sent a welcoming email, they may still use their email address to recover their login credentials.
Role
A user’s role determines their abilities within the WordPress website—for example, whether they are only allowed to read content or to edit content. To learn more about user roles, review the complete Roles and Capabilities article in the WordPress Codex. Also note:
- The default role of a new user will be “Subscriber,” unless you’ve changed this preference within Settings > General > New User Default Role.
Change an Existing User’s Role (Promoting, Demoting, and Disabling Without Deleting)
Sometimes, it is necessary to change an existing user’s role within WordPress. Common use cases for this are:
- A user account needs to be disabled temporarily without deleting the user.
- A loyal user is being promoted within the WordPress website, from a more restricted role like Subscriber, to a role allowing content editing capabilities.
Update a user’s role by locating their profile within the Users table.
- On the User menu in the Dashboard select All Users.
- In the Users table, a user can be found using the Search Users function, by browsing through the list of users manually, or by filtering the list of users by role. To filter by role, click on the appropriate role above the Users table. You may see Administrator, Subscriber, and other roles.
- When the user is located, click on the user’s name to edit their profile, or hover over their name and click Edit below.
- On the profile editing screen, scroll down to the Role dropdown to choose a new role for the user.
- At the bottom of the page, use the Update User button to apply any changes.
Disable an Existing User by Downgrading Their Role
To disable a user without deleting them from the users list, follow the steps for changing a user’s role, but select “No role for this site” as the new role. This role will still allow logging into the WordPress site, though they will not be able to access the administrative area, effectively freezing their account and access to their content, which will still exist on the website. Note that:
- When the user’s email address is changed, they will receive an automated “Notice of Email Change” message via email. This message will not reveal the new email address, though the user will become aware of their account being disabled.
- To fully prevent account access, you would need to change the user’s email address and password. While changing the password temporarily prevents them from logging in, changing the email address will prevent them from regaining access to their account through the password recovery process.
Changing the Role of Multiple Users
From the Users table, you may choose to modify the role of multiple users. This is possible using the checkboxes to the left of each user in the list of users.
- Select the checkboxes next to any users for whom you would like to change the role.
- Use the “Change role to” button above to select a new role for these users.
- Click the Change button to the right of the selected role to apply the change.
Delete an Existing User and Reassign Their Content to Another User
When removing a user from your WordPress website, you’ll need to decide what to do with any content they’ve authored, including posts, pages, comments, or other content types.
- Locate the user to be removed, hover over their username, and click Delete.
- On the next screen, confirm the deletion.
Reassigning a User’s Content to Another User
If the user being deleted has content associated with their account, you’ll want to determine how to reassign their content to another user as author. As part of the deletion screen, you have two options:
- Delete all content – This option removes any pages, posts, or comments this user has created. This option is less common in most situations.
Bulk Deletion of Users
Just as you have the ability to change the role of multiple users from the Users table, you also have the ability to delete multiple users and to assign all of their content to another single user.
- From the Users table, select the checkboxes next to each user in the list you’d like to delete. (You can’t delete your own user account.)
- With the Bulk Actions button at the top of the Users table, select Delete from the dropdown.
- Click the Apply button to be brought to the delete screen with any applicable options.
- Click the Confirm Deletion button to apply changes.
You may be presented with the options to reassign all content to an existing user. This option will apply your selection to all users you’ve marked for deletion. If you’d like to assign different users’ content to different existing users, you’ll need to select each grouping as it’s own bulk action. For example, select some users to delete and assign their content to User A. Then return to the Users table and select other users to delete and assign their content to User B.
Reset a User’s Password, Including Your Own
To manually reset a user’s password, or to change your own, follow the same steps as editing a user’s profile. You may choose to change a user’s password at any time.
- Locate a user to edit in the Users table.
- Click the username or hover over the username to click on the Edit link.
- Scroll down to the password area and click the Generate Password button to be given a new random password.
- Optionally, you may customize this password by placing your cursor into the password field and typing another password.
- If your new password is flagged as Very Weak or Weak, then the password is too simple and may pose a security risk. To use a Weak password, you need to enable the Confirm Password option. For best security practices, a Strong password is highly recommended.
- Click Update User to save your new password.
Also note:
- When a user’s password is changed, the user will receive an automatic notification email alerting them to this change. That email will not reveal the old or the new password to them, but is a security feature to alert that user and give them the ability to contact an administrator if they feel this activity is suspicious.
- If you’re changing your password in your own profile, you have an additional option to log your account out of all devices except your current device. This is a recommended step, particularly when changing your password.
Customize the View of the Users Table
To specify which columns to view on the Users table, or to change the default number of users to list per page, use the Screen Options panel in the upper-right.
- Click on Screen Options to open the panel.
- Optionally uncheck any columns you wish to hide from the Users table.
- Optionally change the number of users to list per page in the paginated results.
- Click Apply to save changes.
You can update the Screen Options at any time to reveal hidden columns or update the number of preferred rows of users. For additional modifications to viewing and managing the Users table, there are many plugins available at WordPress.org.
Allow Users to Create Their Own New Account
It is possible to give visitors to your website the ability to register their own accounts, to minimize the need for you to create new users.
- On the Dashboard go to Settings > General.
- On the General Settings page, scroll down to Membership.
- Check the box for the “Anyone can register” option.
- Scroll to the bottom of the page and click Save Changes.
- Instruct users to visit yourwebsite.tld/wp-login.php?action=register to create their own account.
Also note:
- Depending on your theme, there may be a Register link to invite visitors to the registration URL. This may be in your footer or within a sidebar widget.
- If you’re logged into WordPress with any account, including your own, you will not see the Register link presented on the website when previewing the website. To look for the “Register” link, either log out of your account, or browse to your WordPress website within another browser where you are not already logged into your account.
- If you allow users to register their own accounts, it is recommended for the default user role to be “Subscriber,” unless new users should be allowed to create content within your WordPress website.
Quiz
Which account role is required for managing user accounts in WordPress?
- Editor
- Administrator
- Manager
- Any authorized account
Correct Answer: 2. Administrator
Which one of the following statements is false?
- An editor can manage the pages and posts of other users.
- You can delete a user account and assign their posts and pages to another user.
- You cannot change the display name of your account on posts and pages.
- You can force a reset of a user’s password.
Correct Answer: 3. You cannot change the display name of your account on posts and pages.
What happens if you change the email address for a user account?
- WordPress sends a “Notice of Email Change” message.
- The username will be changed to match the email account.
- The user will not be able to login with their old username.
- You cannot change the email on an account.
Correct Answer: 1. WordPress sends a “Notice of Email Change” message.
If visitors are allowed to register for their own accounts, what should their default role be?
- Subscriber
- Editor
- Administrator
- It depends on the level of engagement I’d like them to have
Correct Answer: 4. It depends on the level of engagement I’d like them to have (and Administrator should not be the default)
