WebP images in WordPress
Objectives
After completing this lesson, participants will be able to:
- Describe what is the WebP image format
- Explain how WebP helps improve performance
- Use a variety of tools to convert images to WebP format
- Upload WebP images to WordPress using the media editor
Prerequisite Skills
Participants will get the most from this lesson if they have familiarity with:
- Familiarity with one or more graphic editing tools
- Uploading images to WordPress using the media library
- Content creation and editing in WordPress
Readiness Questions
- Do you want to improve the performance of your site?
- Have you manipulated images before uploading them to WordPress?
- Have you uploaded images to WordPress using the media library?
Materials Needed
- A local WordPress installation
- One or more images (in PNG or JPG format) to convert to WebP and upload to WordPress
Notes for the Presenter
This lesson plan covers WordPress only in the final section.
Most of the course deals with the WebP image format and how some tools like Photoshop, ImageMagic, and Sqouush can open and save images in the WebP format. In the final part of the lesson, we’ll talk about how to upload WebP images to the WordPress media library.
Even though WordPress may support WebP at the application level it doesn’t mean that it is guaranteed to work for you. It all depends on whether the version of PHP and the graphics library extension running on your host (either GD or ImageMagick) supports the format.
If you’re running an older version of PHP or the graphic library doesn’t support WebP then it won’t work for you. WebP support was first introduced in WordPress 5.8.
It’s recommended for you to have a few images available for people to download or have pointers to open source images like Openverse.
Some people may not like WebP because it was developed by Google. A good counterargument is that the format is open source, it is now supported in all browsers and by several tools as you’ll demonstrate in the lesson.
Lesson Outline
- WebP and WordPress
- What is WebP?
- Why is it important?
- How to create WebP images?
- Photoshop
- ImageMagick
- Squoosh
- Working with WebP in WordPress
- Testing if your server supports WebP
- Using the format in WordPress
- Uploading
- Q & A
Assessment
What is WebP?
- An audio format
- A video format
- A document Format
- An image format
Correct Answer: 4
How do WebP images help with performance?
- By making the images smaller via compression
- By providing lossy compression
- By providing lossless compression
- By making the image look better
Answer. Correct answer 1
Will the WordPress Image Library allow you to upload WebP images?
- Yes
- Only if the underlying server supports it
- No
- Only if the performance lab plugin is installed
Answer. Correct answer 2
The Performance Lab plugin:
- Adds WebP-related functionality
- Adds image-related functionality
- Adds performance-related functionality, including WebP uploads and conversion
Answer. Correct Answer 3
Exercises
Creating WebP images in Photoshop.
How to save images in the WebP format using Photoshop.
- Open the image in Photoshop
- Go to File > Save As
- Select WebP from the format dropdown menu
- Select a name for the file and the location where you want to save it
Creating WebP images in ImageMagick
How to save images in the WebP format using ImageMagick from the command line.
- Change to the directory where the image is located
- Run the following command
convert image.jpg image.webp - Replace image.jpg with the full name of the image you want to convert from and image.webp with the name of the file you want to convert to.
- The file extensions are required. This is how ImageMagick knows what formats it’s working with
Creating WebP images in Squoosh
- Go to Squoosh (squoosh.app)
- Upload the image by clicking on the upload button at the center of the screen
- Select the WebP format from the right-side edit block
- Click on the Save button located on the bottom right side of the screen
Install and configure the performance lab plugin
- Install the performance lab plugin from the WordPress.org plugin directory
- Activate the plugin
- Go to the performance lab plugin settings page (settings > performance)
- Ensure that both Enable WebP Uploads and Enable WebP Support are checked
- Go to your site’s Site Health Status and look for WebP Support
Upload WebP images to WordPress
- If the results from the performance lab plugin report that the server does support WebP, it will allow you to upload the image to WordPress
- If the results from the performance lab plugin report that the server doesn’t support WebP, WordPress will present an error and prevent you from uploading the image
Example Lesson
WebP and WordPress
WebP is an image format created by Google in 2010 as a potential replacement for PNG and JPEG formats currently in use by browsers and image processing software.
It provides both lossy and lossless compression.
Defining lossy compression
Lossy compression, or irreversible compression, is a data-compression method that uses inexact approximations and partial data discarding to represent content. In simpler terms: lossy compression causes data from the initial file to be lost, possibly causing degradation in quality. The process of such compression is irreversible; once lossy compression of the content has been performed, the content cannot be restored to its original state. Therefore, content that has undergone lossy compression should generally not be further edited.
Source: MDN
Defining lossless compression
Lossless compression is a class of data compression algorithms that allows the original data to be perfectly reconstructed from the compressed data. Examples of lossless compression include GZIP, Brotli, WebP, and PNG,
Source: MDN
In most cases, both lossy and lossless WebP images will be smaller than their PNG and JPG equivalents. According to Google’s research, WebP lossless images are 26% smaller in size compared to PNGs. WebP lossy images are 25-34% smaller than comparable JPEG images at equivalent SSIM quality index.
But in more concrete terms, why would converting images to WebP be useful for a WordPress user?
- It will improve your page loading speed
- Images are the largest portion of your website’s content
- The median size of all images requested, as measured in the HTTP archive state of images report is 961.2 KB on desktop and 893.6 KB on mobile (data retrieved on May 20, 2022)
- Ideally, we want to load content and become interactive in under 5 seconds
- If your page takes too long to load your visitors might get tired of waiting and move on to something else
- Combined with an SEO plugin it improves your SEO
- Large files slow down your site and this may impact your site’s page ranking
- Search engines are also likely to crawl and index your images faster
- Creating backups will be faster
- Smaller image file sizes use less bandwidth
- Smaller images take less space on your server
To summarize, there are performance, business, and user experience reasons why we want to make images smaller without sacrificing quality.
How to create WebP images?
We’ll look at three tools we can create WebP images with:
- Photoshop: It’s a widely used commercial image editing program
- ImageMagick: Command-line open-source image processing tools
- Squoosh is a web-based image editor
Both ImageMagick and Squoosh are open-source tools.
We will now look at using different tools to create WebP images from an existing JPG or PNG file.
Creating WebP images in Photoshop
As of version 23.2, Photoshop supports WebP natively. To save an existing image in WebP format follow these steps.
Open the image in Photoshop either from the file menu (File > Open) or by double-clicking the image file.
Go to the Save As menu (File > Save As) and select the WebP format from the format pull-down menu at the bottom of the screen.

Creating WebP images with ImageMagick
ImageMagick is a command-line tool that can be used to create and manipulate images. Since version 7, ImageMagick supports WebP natively.
To convert an image to WebP format follow these steps:
Change to the directory where the image is located. For example, the image name is Photoshop-1.png.
Run the following command:
convert Photoshop-1.png Photoshop-1.webp
Repeat the command for any other image you want to convert, replacing the name of the file on both the original and the WebP instance.
Creating WebP images with Squoosh
Squoosh is a web-based image editor. It supports WebP and other modern image formats for the web.
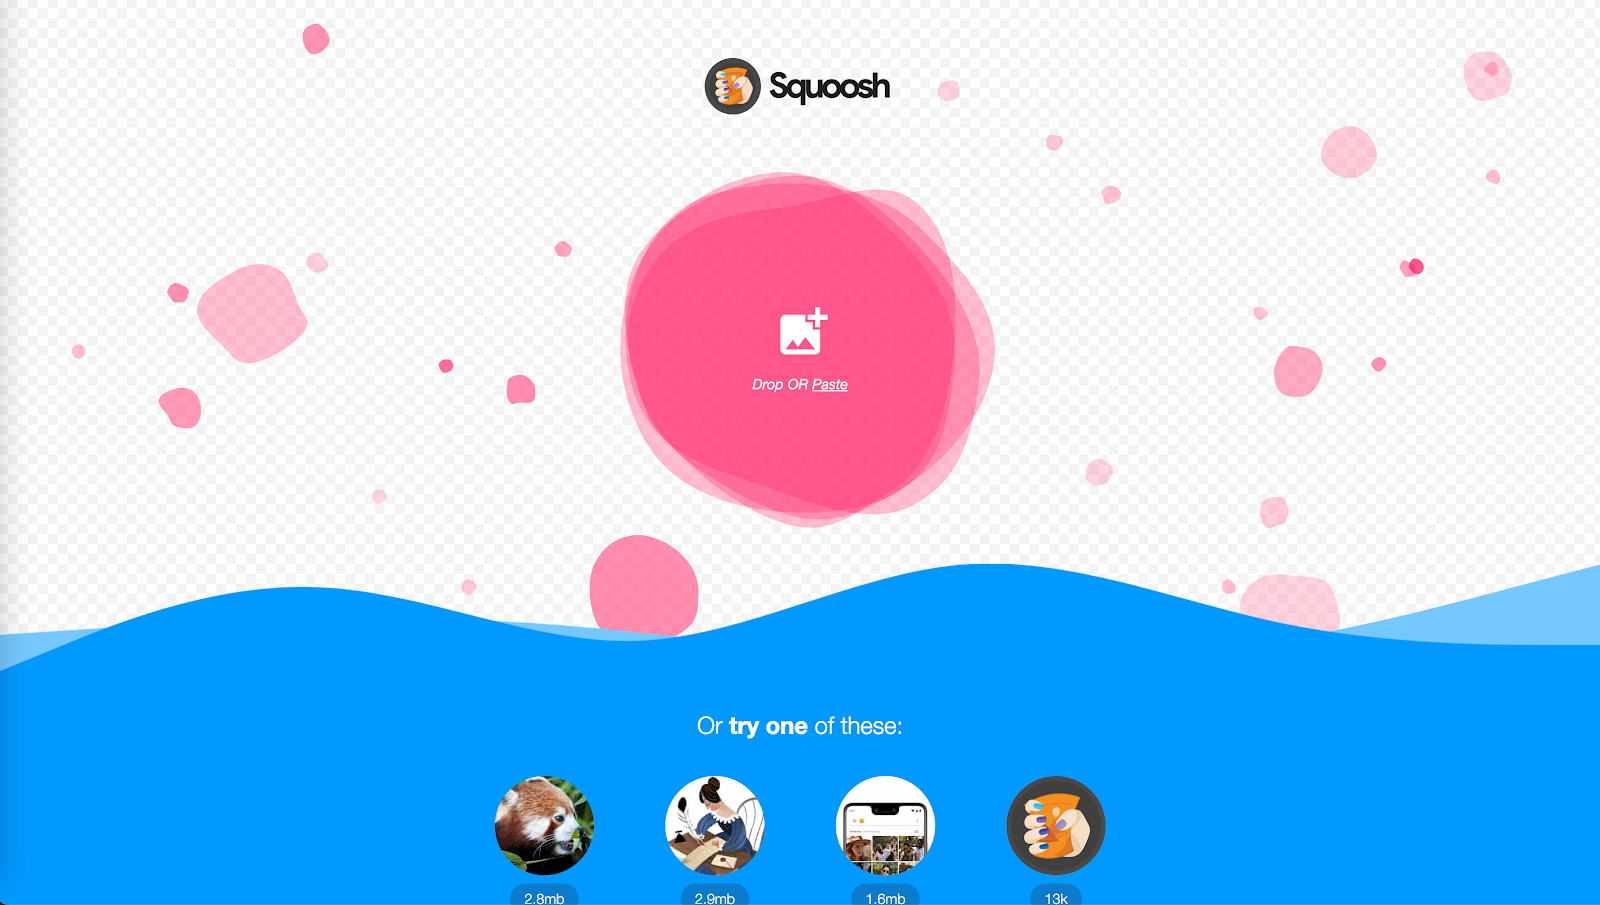
You can open an image in Squoosh in three different ways:
- Click on the image icon at the center of the screen
- This will display an open file dialogue
- Navigate to the image location and double click the image to open it
- Drag the image from your computer to the center of the Squoosh window
- This will open the image in Squoosh
- Paste an image you’ve copied from another application into the Squoosh window. This will display a permission request shown in the image below
- If you grant permission, Squoosh will open the editor with the pasted image.

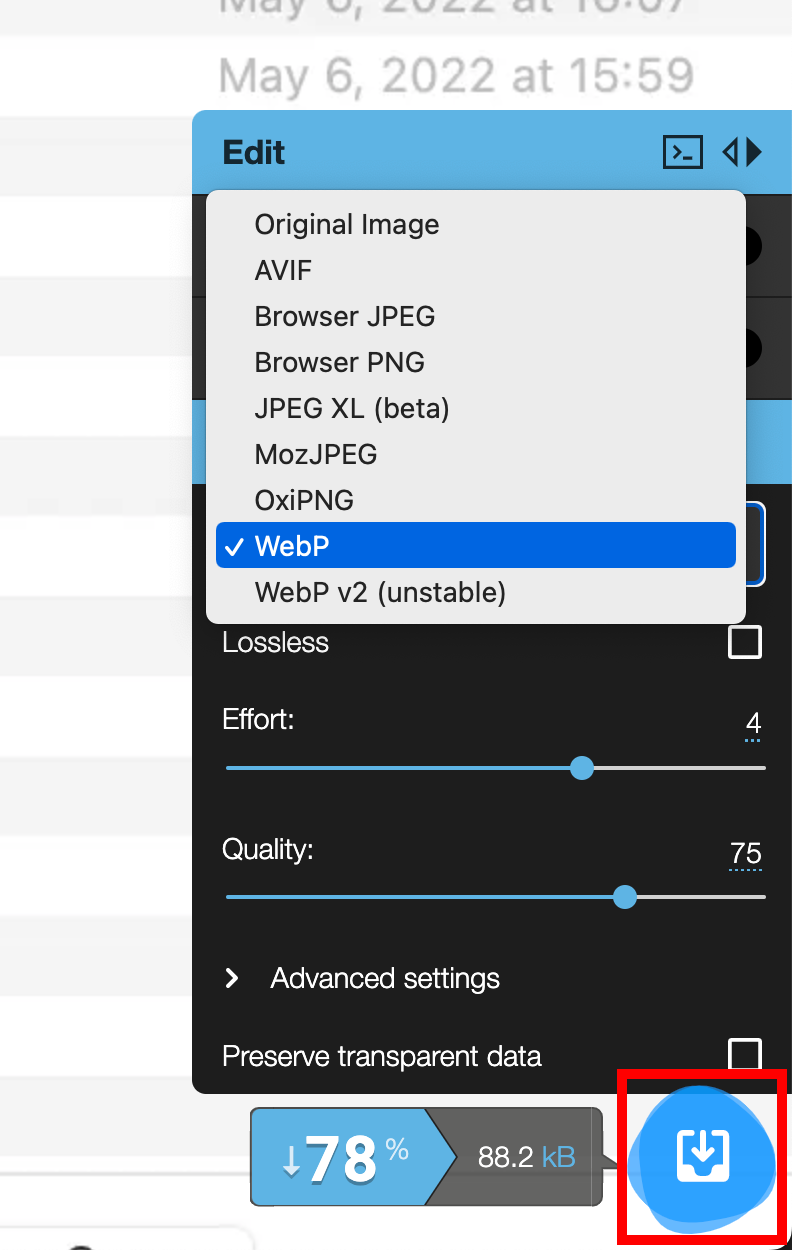
Once an image is uploaded, Squoosh will display the image in the editor screen with the original on the left side of the screen, the image ready to edit on the right with a slider between them that you can move sideways to see if there is a difference between the two images.

On the bottom right of the editor screen, there is a block with two sets of options: Edit and Compress.
In the compressed block, the pull-down menu lets you select the format you want to compress your image with.

Once you’re ready you can download the compressed image by clicking in the bottom right icon on the bottom right corner of the editor screen.
Working with WebP in WordPress
Now that we have WebP images we can use them in WordPress in a two-step process. First, we need to check if the installation of WordPress supports WebP and then we can use it.
While WordPress has supported using WebP images since version 5.8, the underlying graphics library that does the graphics work for WordPress may not be compiled with WebP support, resulting in a failure to work with WebP images.
One way to test if WebP images are supported is to install the Performance Lab Plugin from the WordPress Performance Group. One of the tasks it does is to add a WebP support check to the overall site health menu you can access from the WordPress Dashboard.
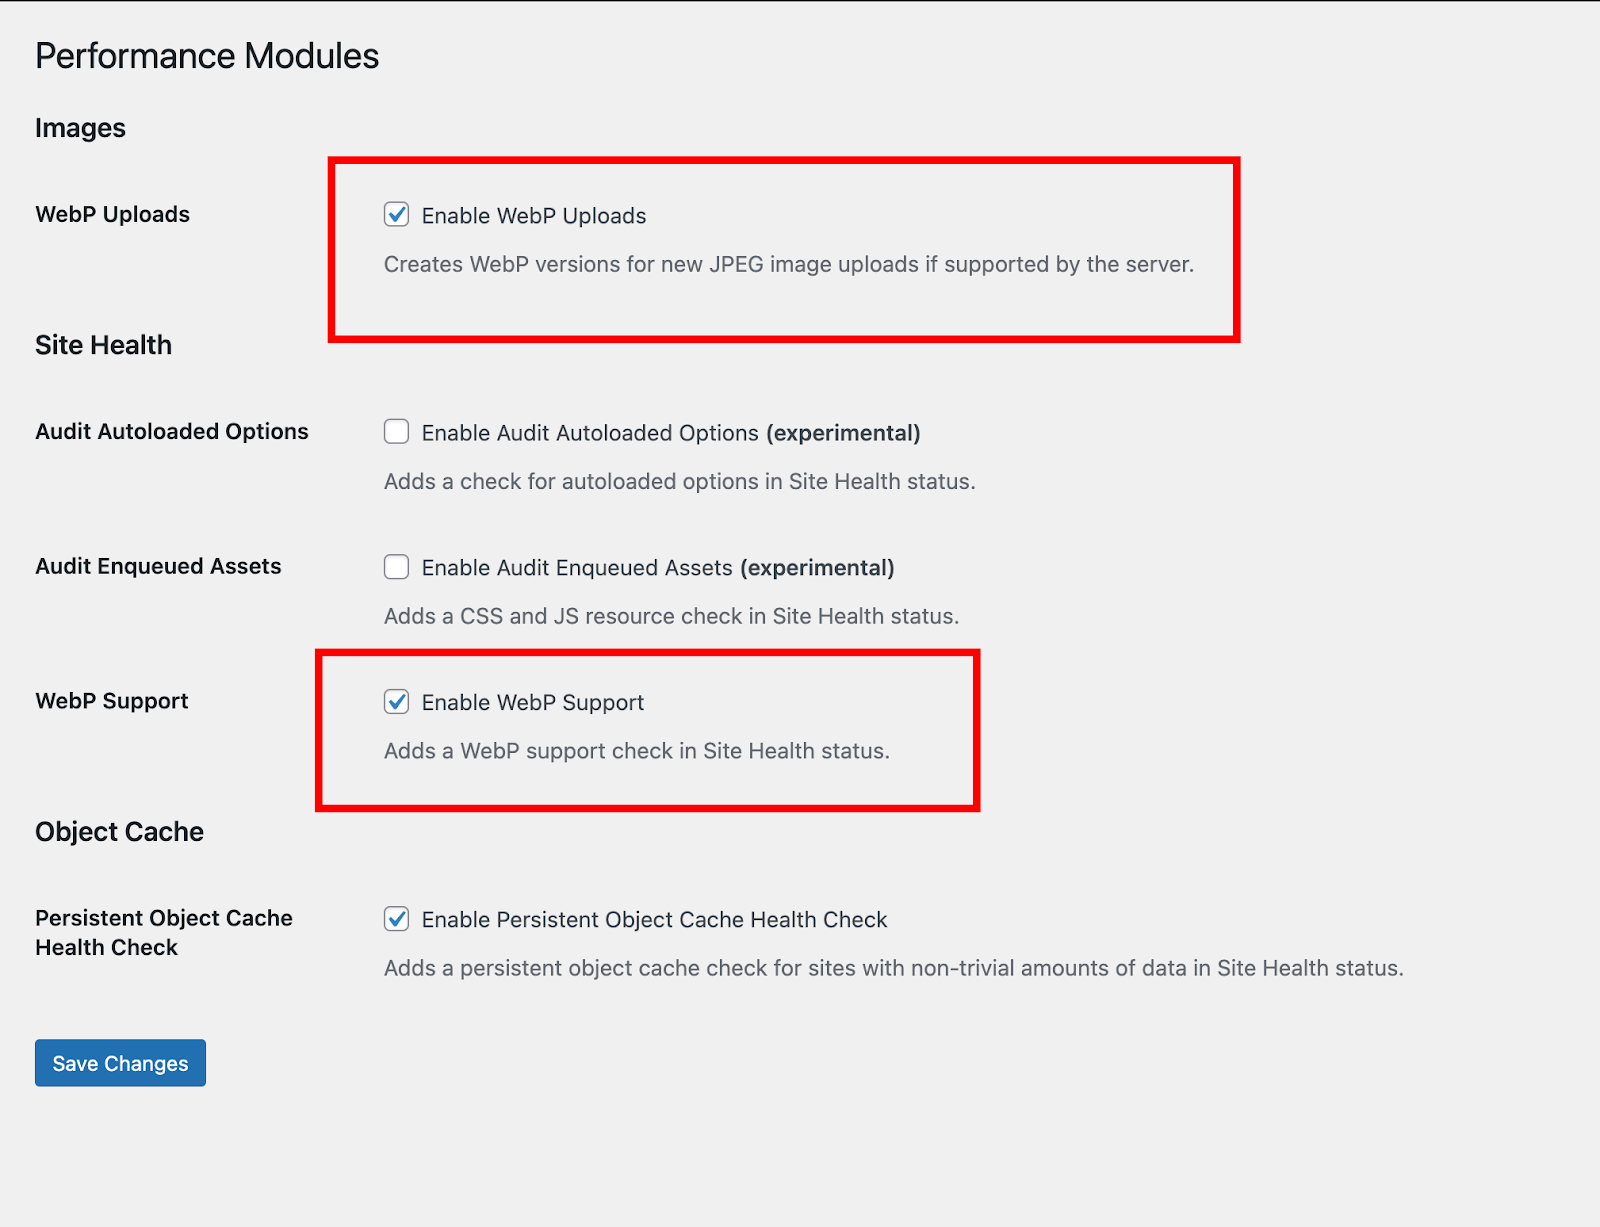
Once you have downloaded and installed the plugin, you will see an additional performance menu under Settings in the WordPress administrator interface

The two options we are interested in are:
- Enable WebP Uploads will enable the use of WebP images in WordPress
- Enable WebP support checks if the server you’re running WordPress on supports WebP (this is separate from WordPress supporting for the format) and displays the results in the Site Health Check report
If the WebP image format is supported then you will see this message. The message is expanded to show both the title and the content of the message.

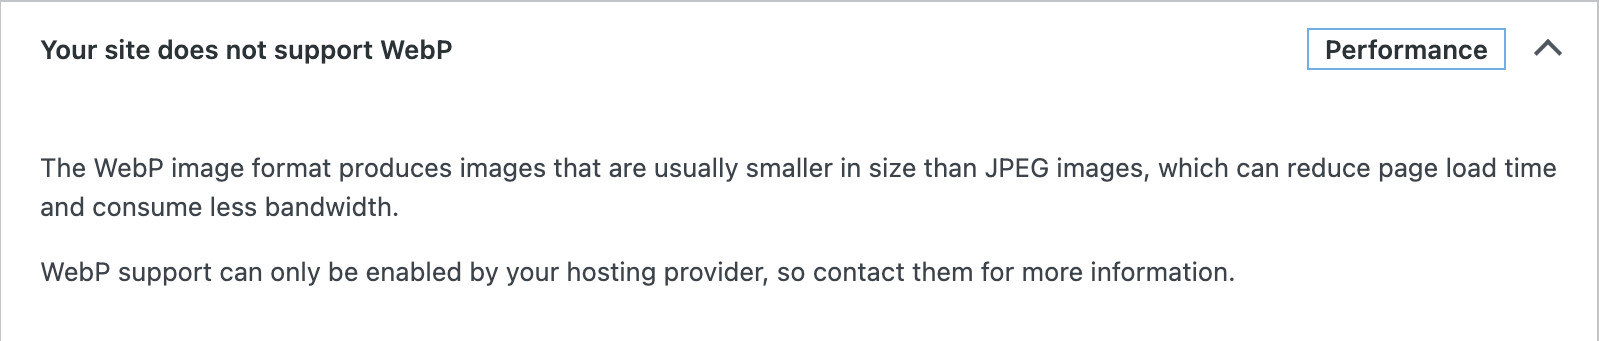
If the WebP image format is not supported, you will the message below instead.
If this is the case you should contact your web hosting provider and ask them to enable WebP support for your server.
If the server supports WebP then you can upload WebP images like usually do.
If your host doesn’t support WebP, you will see an error like this one when trying to upload WebP images.

Additional Resources
- What is WebP
- Tools
- Support in WordPress
Lesson Wrap Up
Follow with the Exercises and Assessment outlined above.