How To Add and Remove Logo And Site Icon in Site Editor
In this lesson, you will learn what is a logo and site icon. Where they are displayed, how to add and remove one without the Customizer.
Objectives
After completing this lesson, participants will be able to:
- Identify a logo and where it appears
- Add and remove a logo to your site without Customizer
- Identify a site icon and where it appears
- Add and remove a site icon to your site without Customizer
Prerequisite Skills
Participants will get the most from this lesson if they have familiarity with:
- Local WordPress Installations
- Installing a Theme
- Introduction to the Site Editor and Template Editor
- Simple Site Design with Full Site Editing
Readiness Questions
- Can you install WordPress?
- Can you install a WordPress theme?
- Are you familiar with the Site Editor?
Materials Needed
- A local install of WordPress running WordPress 5.9 or later
- Twenty Twenty-Two or any block theme
- A graphic for your site logo
- A graphic for your site icon
Notes for the Presenter
- It will be helpful to have a local site created before this lesson with the Twenty Twenty-Two theme installed. If you use a different block theme, you may need to tailor the Lesson Outline.
- Participants may need to download and install WordPress 5.9 or later as well as the Twenty Twenty-Two theme before beginning
- Feel free to change the graphics for the site
Lesson Outline
- Explain what a logo is and why you need one.
- Demonstrate how to add and remove a site logo without the Customizer.
- Explain what a site icon is and why you need one.
- Demonstrate how to add and remove a site icon without the Customizer.
Assessment
Why do you need a site logo? (select all the correct answers)
- To look cool
- To help people identify your brand
- To build trust with your audience
- To be accessible
Answer: #2 and #3
Where does the site logo usually appear? (select all the correct answers)
- In the website footer
- Smartphone home screen
- In your website header
Answer: #3
Where does the site icon appear (select all the correct answers)
- Browser menu bar
- Smartphone home screen
- Website footer
Answer: #1 and #2
You can only use your logo as your site icon.
- True
- False
Answer: #2
Additional Resources
- Support Docs: Twenty Twenty-Two theme
- Support Docs: Site Editor
- Support Docs: How to update your site icon
- Learn WordPress Course: Simple Site Design with Full Site Editing
Example Lesson
What is a logo and why do you need one?
A logo is a graphical representation of your company (or you if you don’t have one). It represents your brand and helps your visitors easily recognise you and build trust. For example, when you see a big red cross what do you think of? The Red Cross. Once you see the logo, you immediately know who the company is.
Check to see if your WordPress theme has any limits on the size of your logo. It is good to have a logo for light backgrounds and another one for dark backgrounds.
How to add and remove a site logo without a Customizer
Before full site editing (FSE), if you wanted to make changes to your theme you would do this using the Customizer. With FSE, making changes to your theme is now done in the Site Editor.
Adding a site logo
- Open your local test site
- Go to Appearance > Editor.
- This defaults to the Site Editor screen where you can make changes to different pages and elements on their site. You also see how any changes you make will look on the front end (desktop, tablet, and mobile).
- Confirm they are on the right page. If using Twenty Twenty-Two they will see the header with the bird pattern.
- Show them they can either:
- Click on a block element
- Go to the List View, to see the elements on their page
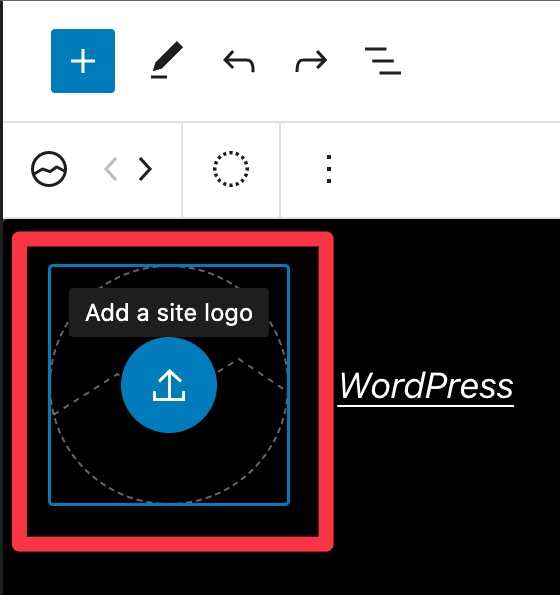
- When you hover over the site logo block, “Add Site Logo” should appear. Click on the site logo block to bring up the “Media Library”.
- Select the graphic you want to use. If the file does not already exist, click on “Upload” to browse your computer and add it to your library. When adding any media to your library, make sure to add the alternative text (alt-text). Alt-text is used by screen readers for site visitors with a loss of vision. Read all about alt-text and how to describe the purpose of an image.
- By default, your logo will be cropped if it is not square and link to your home page. You can change the style and settings by clicking on one of the available options in “Styles” or the “Settings” panel in the selected Block settings.
- To see what the icon looks like on different devices, click on the Preview link at the top of the screen and select the option you want to view.
- If you like the way it looks, click the “Save” button at the top of the screen.
Removing the site logo
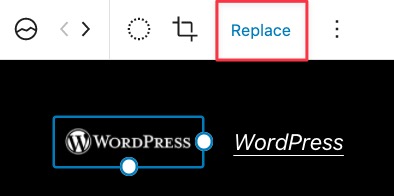
- Click on the site logo block and then click on the “Replace” button.
- You might need to click on the three vertical dots at the top of the screen to make the “Replace” button appear in your options.
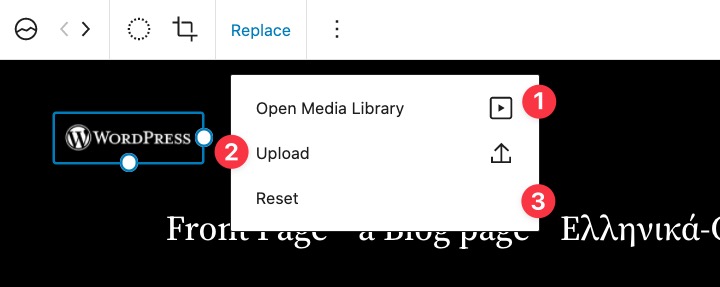
- You now have three options.
- Replace the site logo with an image from the “Media Library”.
- “Upload” a new one from your computer.
- “Reset” the site logo block. Resetting the site logo block removes the icon and the block now shows up as empty.
What is a site icon and why do you need one?
The site icon, also known as a Favicon, is a small graphic that is linked to your website. You see them on your browser (bookmarks, search bars, history results, toolbars) and on your devices as an app icon.
Having a site icon makes it easier for your site visitors to identify you. It also hides your site tagline when adding an icon to a mobile home screen or viewing multiple tabs on a browser, taking up much less space and making it easier to find.
Adding a site icon
- Select the Site logo block to access the “Settings” panel.
- If you want to use your logo the “Use as a site icon” toggle button is on by default.
- If you want to use a different icon, click on the “Site Icon Settings” link.
- Clicking on the “Site Icon Settings” link will take you to the Customizer > Site Identity.
- At the bottom, in the “Site Icon” section, click the “Select site icon” button.
- If the site already has an icon, you will see a “Select image” button instead.
Your WordPress theme may have recommendations for the shape and size of your site icon.
- You can select a graphic from your “Media Library” or “Upload” a file from your computer.
- Once you’ve selected the graphic you want to use, click the “Select” button at the bottom of the screen. Don’t forget to include the alt-text.
- If your image is not a square, you will be prompted to crop your image.
- After cropping, if needed, you will be returned to the Customizer and can see a preview of your site icon in the browser tab.
- If you like the way this looks, click the “Publish” button at the top of the Customizer to save your changes.
Removing a site icon
- After clicking on the “Site Icon Settings” link in the site logo block settings panel, you will be taken to the Customizer > Site Identity.
- At the bottom, in the “Site Icon” section, click the “Remove” button. This will remove the site icon.
- Clicking on the “Change image” button will take you to the Media Library where you can use an existing graphic or upload a new one from your computer.
- Click the “Publish” button at the top of the Customizer to save your changes.
Exercises
Add a site logo to your site
Follow the steps above to add your site logo to the site
Remove your site logo
Follow the steps above to add your site logo to the site
Add a site icon to your site
Follow the steps above to add your site logo to the site
Remove your site icon
Follow the steps above to add your site logo to the site


