Classic Child Themes
Description
In this lesson you will learn what a Classic Child Theme is and when should you use one. The step-by-step walkthrough will give you an understanding of what a Classic Child Theme is and how to create your own Classic Child Theme.
Objectives
At the end of this lesson, you will be able to:
- Explain what a Classic Child Theme is.
- Summarize why you should use a Classic Child Themes.
- Create a Classic Child Theme.
Prerequisite Skills
You will be better equipped to work through this lesson if you have experience in and familiarity with:
- Basic knowledge of HTML/CSS
- Basic knowledge of installing and activating WordPress themes
- Understanding of how folders and files are structured
- Ability to edit files with a text editor
Readiness Questions
- Are you familiar with installing and activating themes via the WordPress Dashboard?
- Do you have at least a basic knowledge of HTML/CSS?
- Do you feel comfortable using a text editor to edit code?
- Will you have a locally or remotely hosted sandbox WordPress site to use during class?
Materials Needed
Notes for the Presenter
- Performing a live demo while teaching the steps to make a classic child theme is crucial to having the material “click” for students.
- It is easiest for students to work on a locally installed copy of WordPress. Set some time aside before class to assist students with installing WordPress locally if they need it. For more information on how to install WordPress locally, please visit our Teacher Resources page.
- The preferred answers to the screening questions is “yes.” Participants who reply “no” to all 4 questions may not be ready for this lesson.
- Built using WordPress 4.7.4.
Lesson Outline
Introduction: What is a Child Theme
Welcome to Classic Child Themes! Today, you are going to learn how to make a Classic Child Theme for WordPress. One of the first things front-end designers want to do is modify the design of an existing WordPress theme. After a little investigation, they discover where the theme files live, then directly edit the files. After the next theme update, they are horrified to discover that the update completely erased all of their modifications. Many designers have learned this lesson the hard way. How do you prevent this from happening? By using a Classic Child Theme! A Classic Child Theme is a theme that overrides and adds elements to another theme (the “Parent” theme) without touching any of the Parent Theme’s code. When the Parent Theme is updated, your changes in the Classic Child Theme will be preserved.
Why use a Classic Child Theme?
The #1 Rule of WordPress development is to never directly modify WordPress files. This means do not edit:
- WordPress core files
- Plugin files
- Theme files*
*Exception: starter themes that have been intentionally created by theme builders for you to modify. Why?
- Updates wipe out customization changes
If you update a modified theme, the update will overwrite all customizations. Similarly, when you update a plugin, the update will overwrite any edits you’ve made. Same for WordPress core files.
- Themes can get broken
If you edit theme files directly and make a mistake that cannot be undone, you are stuck with a broken theme.
- WordPress and WordPress Plugins may not work with theme hacks
You may inadvertently remove elements that WordPress and WordPress plugins look for in a theme, so they no longer work. So how do you safely customize a WordPress theme? Create a Classic Child Theme that is a “child” of another theme (the Parent Theme).
- The Classic Child Theme overrides selected design elements and otherwise falls back to the Parent.
- The Classic Child Theme can also override or add functionality to the Parent Theme.
How Classic Child Themes work
A Classic Child Theme loads first, before the Parent, and only contains overrides and additions to the Parent Theme.
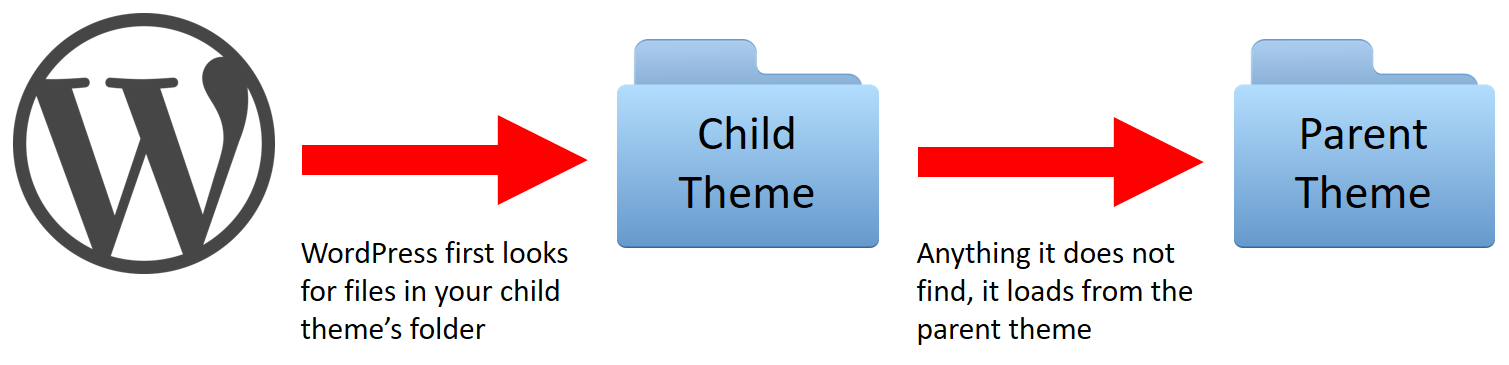
All of your CSS, templates, images, and other files are kept in the Classic Child Theme’s folder while the original Parent Theme’s files are left intact. If something breaks, you can simply delete or fix the offending file in the Classic Child Theme folder.
Creating a Classic Child Theme
You are going to create a Classic Child Theme of the default WordPress theme Twenty Seventeen. We’ll name this Classic Child Theme “MyChildTheme“. A Classic Child Theme only needs a few things to get up and running: a theme folder, a CSS file, and a screenshot file.
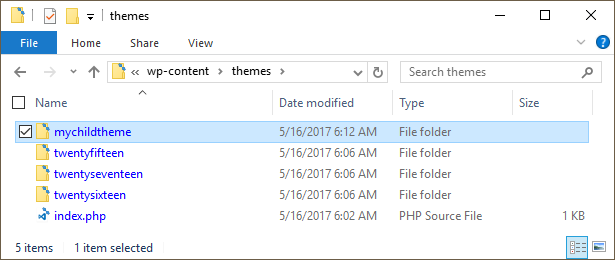
Step 1: A Theme Folder
Every theme for WordPress needs its own folder. Take a look at the folder structure of WordPress. You can see each installed theme’s folder in /wp-content/themes

Create a folder for your Classic Child Theme. The folder name should be all lowercase with no spaces. In our example, the Classic Child Theme’s folder is called “mychildtheme.”
Step 2: A style.css file
At a minimum, your Classic Child Theme needs a style.css file. The style.css file tells WordPress to load the Parent Theme’s files after the Classic Child. Place this file inside the Classic Child Theme’s folder. Make sure it is in the root level of the Classic Child Theme folder and not inside a subfolder. The style.css file needs the following code at the top:
/*
 Theme Name: [Your Theme Name]
 Description: The custom theme [Your Theme Name] using the parent theme Twenty Seventeen.
 Author: [You]
 Author URI: [Your URL]
 Template: twentyseventeen
 Version: 1
 */
- Theme Name: The Name of the theme. This is the name that shows up in the WordPress Dashboard under Appearance > Themes.
- Description: A short description for the theme. You can put anything you like here. This shows up in the WordPress Dashboard under Appearance > Themes once the theme is activated.
- Author: The author of the Classic Child Theme, which can be a person’s name or company name.
- Author URI: The URL for the author of the Classic Child Theme.
- Template: Very Important! This is the folder name of the parent theme. If this variable is not correct the Classic Child Theme will not work.
- Version: The version of the Classic Child Theme
All of these variables are optional, with the exception of **Template:**. If this line is not present or contains typos the Classic Child Theme will not work.
Step 3: Enqueue parent and child theme style sheets
Your Classic Child Theme needs to call the style.css files using a method called “enqueueing scripts.” To add the calls for the parent and child theme stylesheets to your child theme, first, you need to create a functions.php file. Place this file inside the Classic Child Theme’s folder. Make sure it is in the root level of the Classic Child Theme folder and not inside a subfolder.
Note that functions.php in the child theme does not replace functions.php in the parent theme. This is where you can put hooks, actions, and filters that modify or add functionality to the parent theme, rather than replacing it.
The first line of your classic child theme’s functions.php will be an opening PHP tag (<?php), after which you can enqueue your parent and classic child theme stylesheets. The correct method of enqueuing the parent theme stylesheet is to add a wp_enqueue_scripts action and use wp_enqueue_style() in your classic child theme’s functions.php. The following example function will only work if your Parent Theme uses only one main style.css to hold all of the css. If your theme has more than one .css file (eg. ie.css, style.css, main.css) then you will have to make sure to maintain all of the Parent Theme dependencies.
<?php
function mychildtheme_enqueue_styles() {
   wp_enqueue_style( 'parent-style', get_template_directory_uri() . '/style.css' );
}
add_action( 'wp_enqueue_scripts', 'mychildtheme_enqueue_styles' );
?>
This line needs to point to the Parent Theme’s style.css file. Your Classic Child Theme’s style.css file can be empty. But if it contains CSS code, as it usually will, you will need to enqueue it as well. Setting ‘parent-style’ as a dependency will ensure that the child theme stylesheet loads after it.
function mychildtheme_enqueue_styles() {
    $parent_style = 'parent-style';

    wp_enqueue_style( $parent_style, get_template_directory_uri() . '/style.css' );
    wp_enqueue_style( 'child-style',
        get_stylesheet_directory_uri() . '/style.css',
        array( $parent_style )
    );
}
add_action( 'wp_enqueue_scripts', 'mychildtheme_enqueue_styles' );
This is the recommended way to enqueue the styles for your Classic Child Theme.
The old way of enqueuing scripts and styles was to use @import url("../parentfolder/style.css");, and you’ll still see old articles online that show that technique. But this is very inefficient, so a better way is to use the wp_enqueue_style() method covered here.
Step 4: A screenshot.png file
A theme’s screenshot is the thumbnail image that shows up under Appearance > Themes in the WordPress Dashboard. A screenshot image is not required for a Classic Child Theme, but it will look sad without one.

The recommended image size is 880×660. The screenshot will only be shown as 387×290, but the larger image allows for high-resolution viewing on HiDPI displays. Create an 880px by 660px image file, name it “screenshot.png”, and place it into the classic child theme’s folder. If you don’t have an image editor, download a sample screenshot.png file.
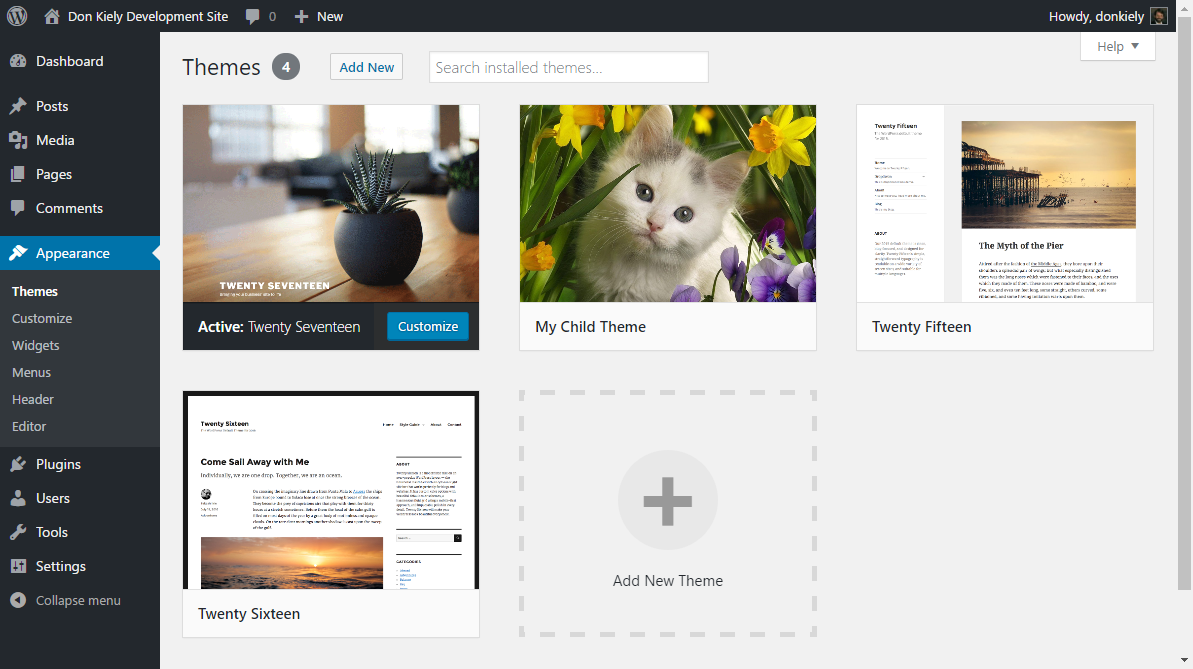
Activate the Classic Child Theme
You now have everything you need to use a Classic Child Theme! Make sure the Classic Child Theme folder containing at least style.css is uploaded or pushed to /wp-content/themes on the webserver, or your computer if you are working on a local WordPress install. After you add the theme folder to /wp-content/themes, go to Appearance > Themes in the Dashboard. You should see your theme listed.
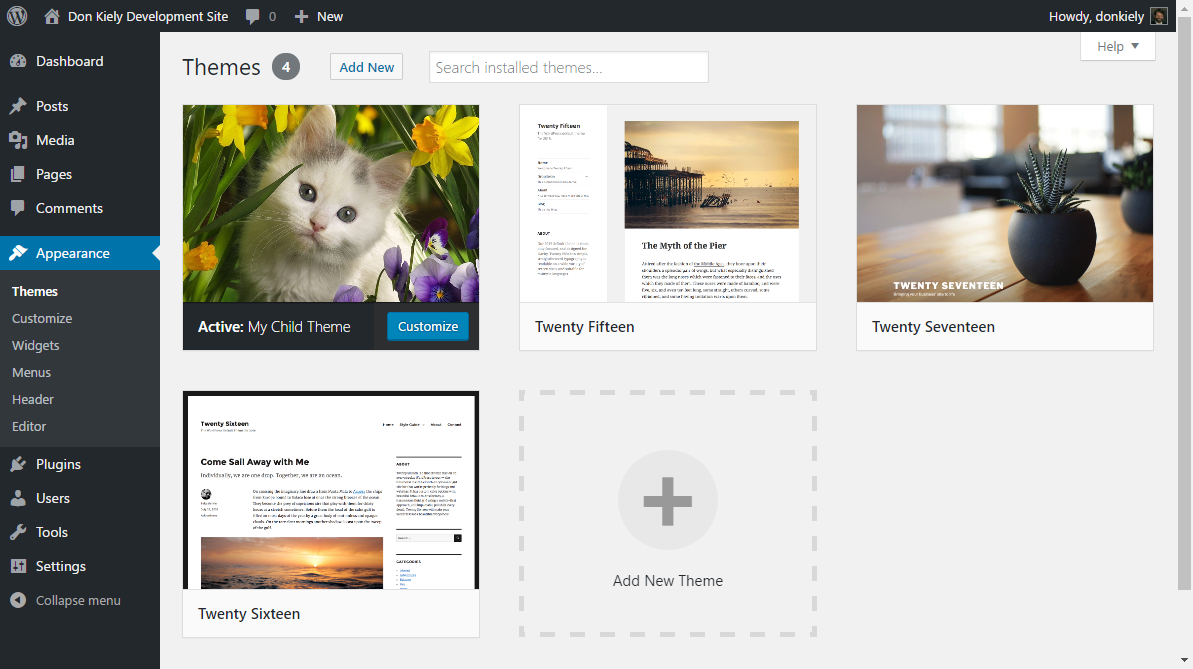
Hover over your theme to reveal the “Activate” button. Click to activate your theme. Once activated, the site will not look any different on the front-end, but the Classic Child Theme will be the theme in charge. You can now see your theme labelled as “active”.
Classic Child Theme Files
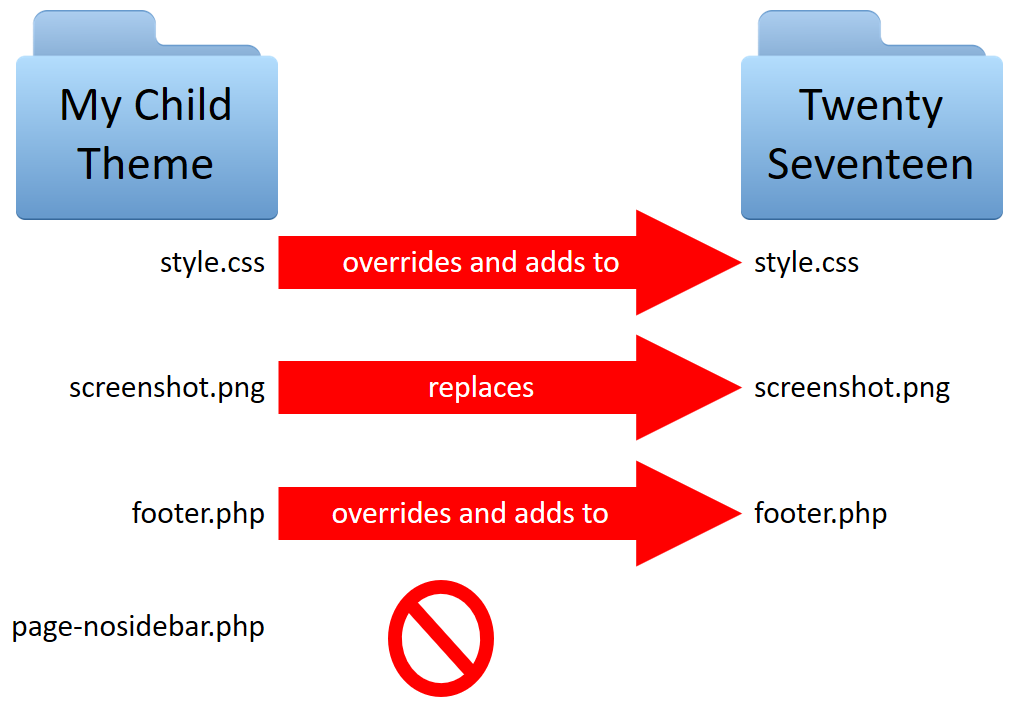
The files in the example illustrate how a Classic Child Theme’s files affect the Parent’s files: they either override elements and add functionality to its identically named file, or completely replaces it.

style.css in MyChildTheme overrides elements and adds to style.css in Twenty Seventeen, while screenshot.png completely replaces the copy of screenshot.png in Twenty Seventeen.
Overriding the Parent Theme’s CSS
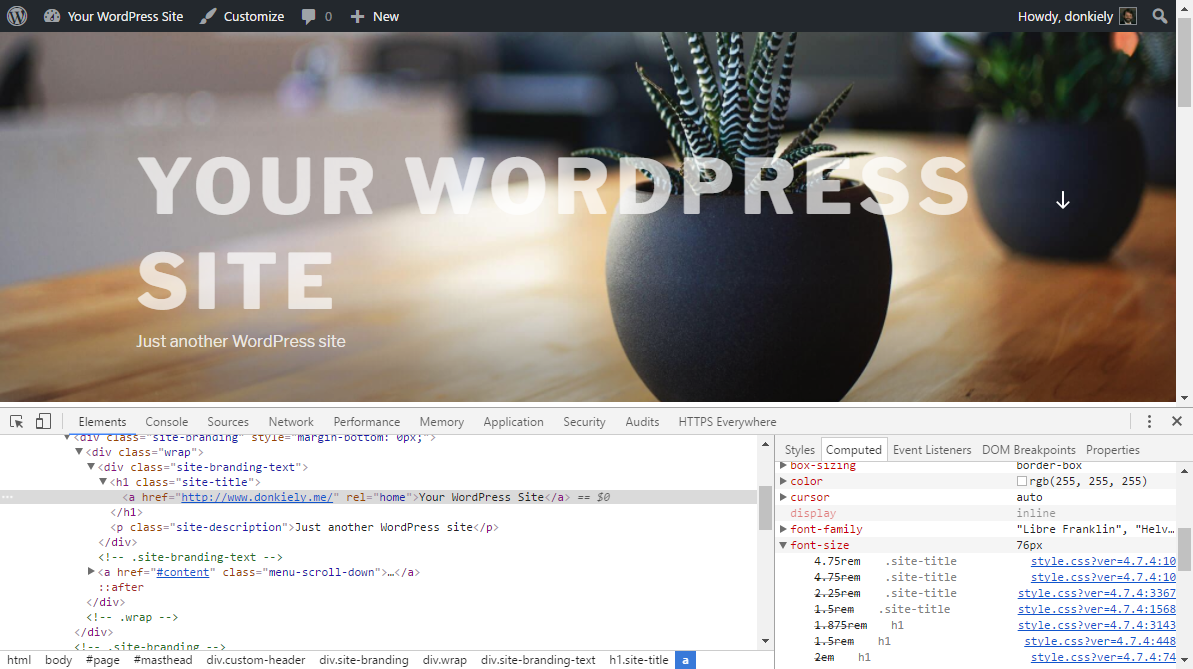
The Classic Child Theme’s style.css file will override any styles in the Parent Theme’s style.css file that have the same selectors. Let’s say you wanted to change the size of the Site Title in the header. Inspecting that element reveals the CSS selector .site-title shows that the Parent Theme sets the font size at 2.25rem. (This is using the inspector in Google Chrome, but all the major browsers show this information in different formats.)
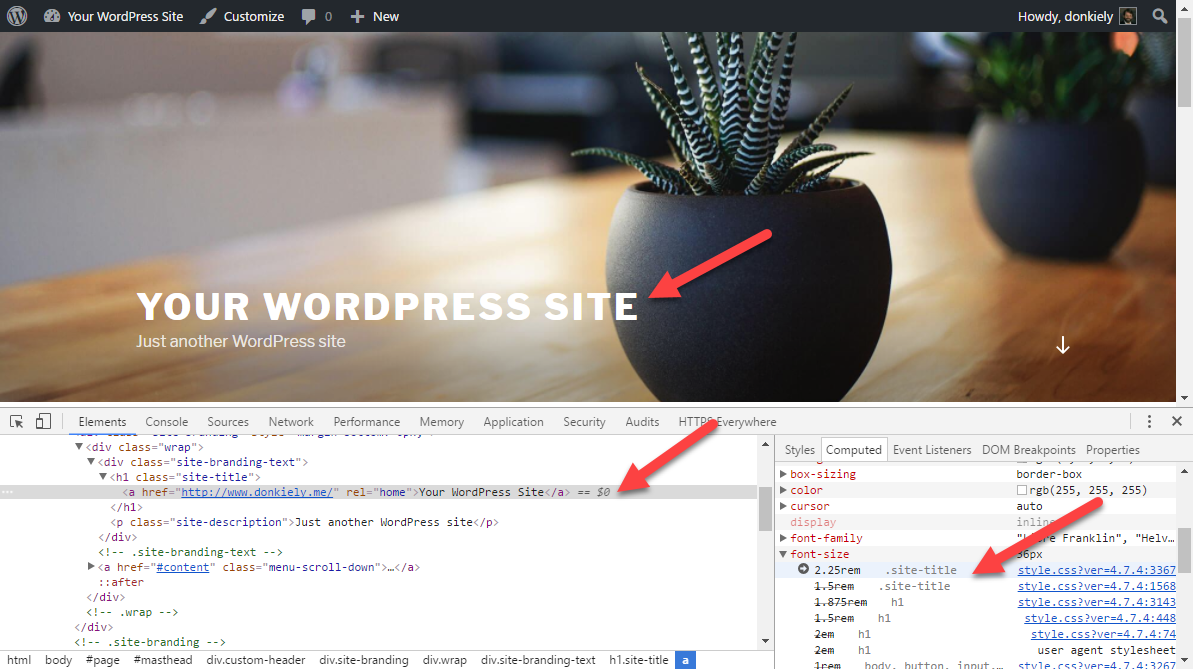
In the Child Theme’s style.css file, add the selector and the font-size you want to change the Site Title to:
.site-title {
    font-size: 4.75rem;
    line-height: 1.25;
}
Now the Site Title is 4.75rem instead of 1.75rem.
Overriding the Parent Theme’s Templates
Templates are the files that control how your WordPress site will be displayed on the Web. Inside the twentyseventeen folder are all of Twenty Seventeen’s template files. You can create your own versions of these files in your Classic Child Theme.

Let’s say you want to replace the text “Proudly powered by WordPress” in the footer with copyright. Here’s how it looks now:

Open footer.php in the twentyseventeen folder. You can see the following line of code that needs to be edited. This statement pulls in a template with the “Proudly powered by WordPress” message. You’ll no longer need to use that template file, so this is the statement you’ll replace.
get_template_part( 'template-parts/footer/site', 'info' );
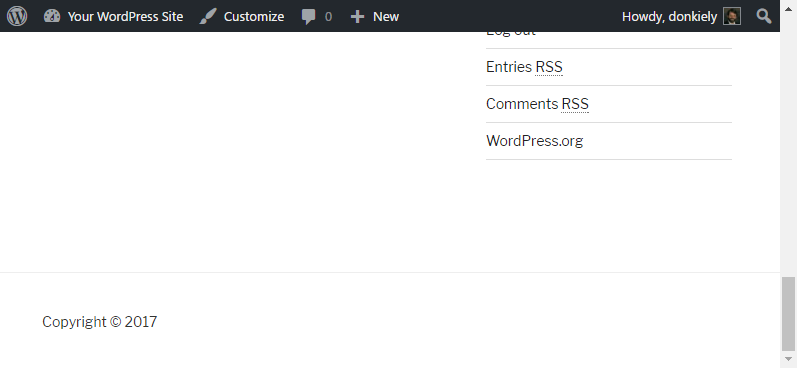
?>Save a copy of footer.php into the Classic Child Theme folder. You can safely edit this Classic Child Theme file, leaving the original copy of footer.php in wp-content/themes/twentyseventeen intact. Just like your other Classic Child Theme files, wp-content/themes/mychildtheme/footer.php will override the Parent copy. To display a Copyright line, replace the content above in footer.php in wp-content/themes/mychildtheme with the following code:
?>
 <div class="site-info">
    Copyright © <?php echo date('Y'); ?>
 </div><!-- .site-info -->
The result on the front-end of the site:
Adding new Templates
In addition to being able to override existing templates with a Classic Child Theme, you can also create new templates. Let’s say you want to add a new Template without a sidebar. Make a copy of index.php in your Classic Child Theme and rename it index-nosidebar.php. Edit the existing code at the top:
<?php
/**
* The main template file
*
* This is the most generic template file in a WordPress theme
* and one of the two required files for a theme (the other being style.css).
* It is used to display a page when nothing more specific matches a query.
* E.g., it puts together the home page when no home.php file exists.
*
* @link https://codex.wordpress.org/Template_Hierarchy
*
* @package WordPress
* @subpackage Twenty_Seventeen
* @since 1.0
* @version 1.0
*/

get_header(); ?>
to the following:
<?php
/*
Template Name: Page with no sidebar
*/
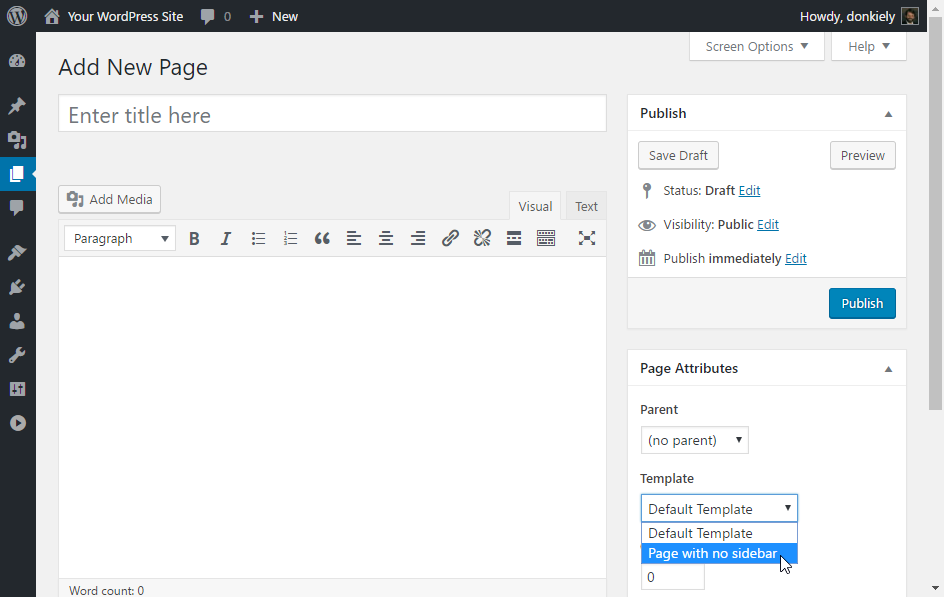
get_header(); ?>The name of the template goes after the variable Template Name:. Finally, find and remove the line of code near the end of the file which loads the sidebar. This is called get_sidebar();:
</main><!-- #main -->
    </div><!-- #primary -->
    <?php get_sidebar(); ?>  // DELETE this line!
</div><!-- .wrap -->
<?php get_footer();  // leave this line in!
The new template will now appear under Page Attributes on the Edit Page screen:
Summary
Your Classic Child Theme now has one file that overrides elements in its Parent Theme’s file, two files that replace files in the Parent Theme, and one brand new file that does not exist in the Parent Theme.
When you update the Parent Theme with a new version, none of these Classic Child Theme files will be modified. Classic Child Themes are a safe and powerful way to override and add elements to an existing theme. Now that you know how to make one, go forth and make some awesome looking sites!
Exercises
Create a classic child theme of Twenty Seventeen
- What folders and files did you need to create?
- Did your theme show up under Appearance > Themes in the Dashboard? If not, what steps did you take to troubleshoot?
Change all the links in your theme to red, active links to green, and visited links to orange
- What file did you need to edit to do accomplish this?
- What selectors did you apply the new color styles to?
- How did you determine the selectors to use?
Change the “Proudly powered by WordPress” message in the site footer
- What file did you need to create?
- What steps did you take to create the file and change the message?
Make a new template for the home page with no sidebar.
- What file did you create?
- What steps did you take to create the file?
- What code did you add to make it a new template?
- How did you remove the sidebar?
- How did you assign the new template to the home page of your site?
Assessment
When developing for WordPress, what files should you never edit?
- Core WordPress files
- Plugin files
- Theme files
- All of the above
Answer: 4. All of the above
What file must you create to make a classic child theme, in addition to the classic child theme folder?
- functions.php
- index.html
- style.css
- readme.html
- license.txt
Answer: 3. style.css
What items do you have to include in the style.css file of your Classic Child Theme in order for it to work properly?
- Theme Name: [Name] and Template: [parentfolder]
- Theme Name: [Name] and Version: [#]
- Description: [Theme description] and
wp_enqueue_style( 'parent-style', get_template_directory_uri() . '/style.css' ); - Template: [parentfolder] and
wp_enqueue_style( 'parent-style', get_template_directory_uri() . '/style.css' ); - Theme Name: [Name] and
wp_enqueue_style( 'parent-style', get_template_directory_uri() . '/style.css' );
Answer: 4. Template: [parentfolder] and wp_enqueue_style( 'parent-style', get_template_directory_uri() . '/style.css' );
How do you get a picture of your theme to show up under Appearance > Themes in the Dashboard?
- Upload screenshot.png to the child theme folder
- Upload screenshot.png to the the parent theme folder
- Upload screenshot.png to the /images folder of /wp-admin/
- Upload screenshot.png to the /images folder in /wp-content/
Answer: 1. Upload screenshot.png to the child theme folder